Navigation Management
Navigation management refers to the implementation of how users navigate through different screens, which include:
- 🐔 navigation between activities
- 🥚 navigation between fragments
- 🍃 navigation to another app
- ...
This usually involves a few classes:
- Intents ✈️: to start an activity
- Navigation Component 🚀: to navigate between fragments
It's worth noting that navigation involves what we call the back stack which may lead to unexpected behaviors if not handled.
Application back stack
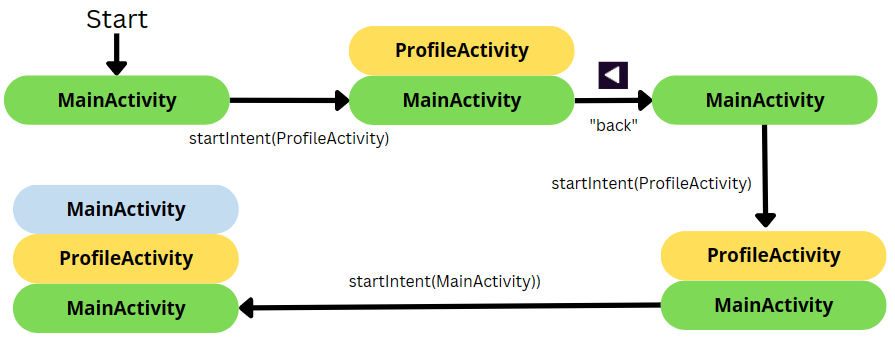
Android activities are pilled up in something called the "back stack". On older devices, users can use the "back arrow" to "go back": the current activity is popped out, and we load the previous one. If there are none, then the app is terminated.

It's always the activity at the top that is shown to the user.
At the end of the example, we got two instances of "MainActivity". It's important to consider if this behavior is acceptable or not. If not, you should pass flags to your Intent using Intent#addFlags.
👉 For instance, if the user logs out, he should not be able to press "back", and go back to the "connected area".
- Manual "back" (pop out current)
intent.addFlags(Intent.FLAG_ACTIVITY_CLEAR_TOP)
Intents
An intent is an object representing an action to be performed, such as navigating to another activity. There are two kinds of intents:
- Explicit: ask specifically for something (ex: start the Activity XXX)
- Implicit: request another application/the system (ex: open link)
Create an intent
// create an intent
val intent = Intent(SOME_PARAMETERS)
// start
startActivity(intent)
Pass arguments to the next activity
To pass arguments to the next activity, use:
// before using startActivity
intent.putExtra("param", "a value")
From the started activity, to get back arguments, use:
// ➡️ Within An Activity
val param = intent?.extras?.getString("param")
// ➡️ Within A Fragment
val param = requireActivity().intent?.extras?.getString("param")
val param = activity?.intent?.extras?.getString("param")
Explicit intent
Ex: to navigate to "MainActivity"
// ➡️ Within An Activity
val intent = Intent(this, MainActivity::class.java)
// ➡️ Within A Fragment
val intent = Intent(requireContext(), MainActivity::class.java)
val intent = Intent(context!!, MainActivity::class.java)
Implicit intent
Open a link/mail/phone
Open a URL (https:), a mail (mailto:), or a telephone (tel:). For instance, given a URL, it will try to open it in a browser...
val intent = Intent(Intent.ACTION_VIEW, Uri.parse("???"))
Share something
val intent = ShareCompat.IntentBuilder.from(this)
        .setText("...")
        .setType("text/plain")
        .intent
Send an email
val intent = Intent(Intent.ACTION_SEND)
    .setType("text/plain")
    .putExtra(Intent.EXTRA_SUBJECT, "xxx")
    .putExtra(Intent.EXTRA_TEXT, "yyy")
    .putExtra(Intent.EXTRA_EMAIL, "a@b.c")
⚠️ How to properly run an implicit intent ⚠️
What if you try to open a link in a browser, but the user uninstalled every browser? It will fail. You have to handle errors!
- Option 1: check if the startActivity fails
try {
    startActivity(intent)
} catch (ex: ActivityNotFoundException) {
    // use a toast / ...
}
- Option 2: check before starting the intent
if (packageManager.resolveActivity(intent, 0) != null) {
    startActivity(intent)
}
🧭 Navigation Component 🧭
The navigation component is a Jetpack component to handle the navigation between fragments.
dependencies {
  implementation "androidx.navigation:navigation-fragment-ktx:2.5.3"
  implementation "androidx.navigation:navigation-ui-ktx:2.5.3"
}
Create a navigation graph
From the resource manager, go to "navigation", then add a new navigation. For instance, "example_navigation". The generated example_navigation.xml is the following:
<?xml version="1.0" encoding="utf-8"?>
<navigation xmlns:android="http://schemas.android.com/apk/res/android"
    xmlns:app="http://schemas.android.com/apk/res-auto"
    android:id="@+id/example_navigation">
</navigation>
Add destinations
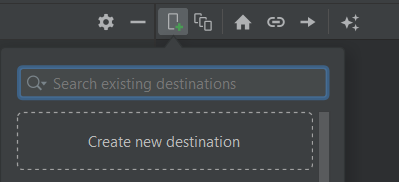
Switch back to the Design View of the XML. Create or import your Fragments by clicking on the phone with the plus/add icon.

➡️ To change the "home" fragment, select a fragment, and click on the home icon. The home fragment is the one loaded by default.
Create a NavHost
Now, you need to create a container. This container will host your navigation graph. It will load the default fragment, and show another fragment when prompted.
<androidx.fragment.app.FragmentContainerView
  android:id="@+id/nav_host_fragment"
  android:name="androidx.navigation.fragment.NavHostFragment"

  app:defaultNavHost="true"
  app:navGraph="@navigation/example_navigation" />
➡️On old devices, there is an arrow to go "back". If defaultNavHost is set to true, then "back" will go back to the previous fragment.
Navigation
Inside example_navigation.xml, each fragment should have an Id.
findNavController().navigate(R.id.DESTINATION_ID)
You can also create an action (=link), by linking two destinations. Then, use the action's Id
findNavController().navigate(R.id.action_xxx_to_yyy)
Additional notes
Setup the navbar to follow a NavHost
This will set the "label" of a fragment (see the navigation file) as the title of the screen. Moreover, this will add a button "back" to go back to the previous fragment.

class MainActivity : AppCompatActivity() {
    private lateinit var navController: NavController

    override fun onCreate(savedInstanceState: Bundle?) {
        super.onCreate(savedInstanceState)
        setContentView(R.layout.activity_main)

        val navHostFragment = supportFragmentManager.findFragmentById(R.id.nav_host_fragment) as NavHostFragment
        navController = navHostFragment.navController
        // show the label in the menu bar
        // and the icon "back" when needed
        setupActionBarWithNavController(navController)
    }

    // pressing "back" in the menu, will go back
    override fun onSupportNavigateUp(): Boolean {
        return navController.navigateUp() || super.onSupportNavigateUp()
    }
}
Pass arguments to another fragment
For that, you must create an action. Then, click on the screen that must receive the parameter. In the section, add arguments.
findNavController().navigate(R.id.action_first_to_second, Bundle().apply {
  // Ex: passing a string
  putString("key", "value")
})
in the fragment receiving the arguments, use
val value = arguments?.getString("key")
👉 The problem with that, is that there is no verification of the argument being passed or stuff like that. So, we use SafeArgs when we want to do things safely.
// At the top of your build.gradle
buildscript {
    dependencies {
        classpath "androidx.navigation:navigation-safe-args-gradle-plugin:2.5.3"
    }
}

// after plugin { ... }
apply plugin: 'androidx.navigation.safeargs.kotlin'
SafeArgs will generate a class XXXDirections with XXX the name of the current class.
-findNavController().navigate(R.id.action_first_to_second, Bundle().apply {
-  putString("key", "value")
-})
+val destination = FirstDirections.actionFirstToSecond(key = "value")
+findNavController().navigate(destination)
Again, SafeArgs will generate a class XXXArgs with XXX the name of the current class.
-val value = arguments?.getString("key")
+val args by navArgs<XXXArgs>()
+val value = args.key
Navigation back stack
It's the same as for the application and activities, but with each Activity having a back stack of fragments.
- Remove every fragment until the previous one is either null or a fragment with the Id "DESTINATION_ID".
<action
+  app:popUpTo="@id/DESTINATION_ID"
  />
- Remove every fragment until the previous one is either null or the fragment BEFORE a fragment with the Id "DESTINATION_ID".
<action
  app:popUpTo="@id/first"
+  app:popUpToInclusive="true"
  />
- You can call methods from the code too
findNavController().popBackStack()
👻 To-do 👻
Stuff that I found, but never read/used yet.
- Android bottom navigation
- Nested navigation graphs
- Deep Link
// Args must be serializable
@Serializable
@SerialName("id") // rename field

val xxx =  registerForActivityResult(ActivityResultContracts.StartActivityForResult()) { result ->
    val yyy = result.data?.getSerializableExtra("yyy") as YYY
}
xxx.launch(intent)

