Unity Scripts 🐲
Unity Scripts are written in C#. The version of C# used changes according to the editor version.
For reference, it's C# 9.0 for Unity 2022.3. Note that some features from each C# version were not implemented in Unity. Refer to the Unsupported features of the link above.
Inside the project window of the editor, you can create new scripts, for instance, Example.cs. We usually store them in a folder Scripts.
✍️ Unity Scripts are documented in the Scripting Reference.
The name of the script is the same as the name of the class. Use UpperCamelCase for naming scripts/classes.
using UnityEngine;

public class Example : MonoBehaviour
{
    // Awake is called when the script instance is being loaded
    private void Awake() { }

    // Start is called before the first frame update
    private void Start() { }

    // Update is called once per frame
    private void Update() { }
}
Game Objects and MonoBehavior
Most unity scripts are inheriting the class MonoBehaviour as it is the base class for components that can be attached to GameObjects.
Associated Game Object
The associated game object is available in the gameObject attribute. You can edit any value as you would in the editor.
// Name of the game object (attribute 'name')
// Tag of the game object (attribute 'tag')
// State of the game object (attribute 'enabled')
// Access the TransformComponent (attribute 'transform')
string previousName = name;  // store in a variable
name = "Hello, World";       // change the name
➡️ You can use this.attribute or gameObject.attribute too.
Access Components Of A Game Object
// the component is Rigidbody
Rigidbody r = GetComponent<Rigidbody>();
Rigidbody r = gameObject.GetComponent<Rigidbody>(); // same
r = GetComponentInChildren<Rigidbody>(); // us + nested
r = GetComponentInParent<Rigidbody>();   // parent
r = FindObjectOfType<Rigidbody>();       // across all
You can disable a component c with c.enabled = false.
Accessing Other Game Objects
You can find game objects that have a tag tagName:
GameObject obj = GameObject.FindWithTag("tagName"); // null if not found
GameObject obj = GameObject.FindGameObjectWithTag("tagNametagName"); // same
GameObject[] objects = GameObject.FindGameObjectsWithTag("tagName");
Basic Methods
Game Object Methods
Clone a game object, e.g., create a new one.
var _obj = Instantiate(obj);
var _obj = Instantiate(obj, pos, rot);
var _obj = Instantiate(obj, pos, Quaternion.identity);
Destroy a game object.
Destroy(obj);
Destroy(obj, time_before_death);
Call a method on every MonoBehavior of our game object.
SendMessage("methodName");
SendMessageUpwards("methodName"); // and on its ancestors
Navigation Between Scenes
You can use the following methods to navigate between scenes registered in the SceneManager.
SceneManager.LoadScene(buildIndex);
SceneManager.LoadScene("SceneName");
⚠️ When navigating between scenes, every game object is destroyed, aside from the game objects marked as DontDestroyOnLoad and static variables. We often use Singletons and Dependency Injection.
Position-Related Methods
A class used to represent a position (x,y) or (x,y,z).
// shortcuts to create vectors
Vector3.back, Vector3.down, Vector3.up, ...
someVector.normalized; // magnitude=1, just a direction
Vector3.MoveTowards(current, target, maxDistancePerStep);
Vector3.Reflex(inDirection, inNormal) // sort of mirror, bounce
if (Vector3.Distance(a, b) <= 0.0001f) {} // a near b?
Serialize Field
SerializeField makes the attributes of the script visible from the inspector, allowing users to edit them.
[SerializeField]
private int number = 0;
// Can be on one line
[SerializeField] private int number = 0;
The result is:

📚 The field shown is determined based on the attribute type.
We can customize the inspector for our script. There are a few existing attributes we can use, while there are libraries with new attributes.
- Existing Attributes
- NaughtyAttributes: an open-source library 🚀
- Markup-Attributes: another open-source library ✨
- Odin: paid unity plugin
➡️ The archived Unity-Attributes-Example project listed quite a lot of examples to learn how to use the existing attributes.
⚠️ Any "public" attribute is visible in the editor, but it's a side effect.
📚 You can merge attributes: [A][B] and [A,B] is the same.
Coroutines
A coroutine is a task that can be paused. They are quite used for tasks such as animations and delays. It's a normal function that has multiple returns according to our needs:
yield return null: pause until the next frame/update callyield return ...new WaitForSeconds(1f);: wait for roughly 1 secondnew WaitUntil(Function);: wait untilFunctionreturns truenew WaitWhile(Function);: wait untilFunctionreturns falsenew WaitForSecondsRealtime(1f): wait for 1 real second- You can create new ones by extending
CustomYieldInstruction - ...
yield break: mark the task as donereturn/End-Of-Function: implicityield break
👉 Function could be an inline function: () => true.
📚 Use Invoke(methodName, n) to call methodName after waiting n s.
Declare a coroutine function
private IEnumerator MyCoroutine()
{
    // when started, wait for one second then print "some code"
    yield return new WaitForSeconds(1f);
    Debug.Log("Some code");
}
Start/Stop your coroutine
StartCoroutine(MyCoroutine());
StartCoroutine(nameof(MyCoroutine)); // same
StartCoroutine("MyCoroutine");       // same
// You need to store the result to stop it manually
var c = MyCoroutine();
StartCoroutine(c);
StopCoroutine(c);
StopAllCoroutines();
Unity Scripts Existing Attributes
Add Tooltips
Add a message shown when hovering the property.
[Tooltip("Some description blah blah blah")]
[SerializeField] private int number = 0;
Add Headers
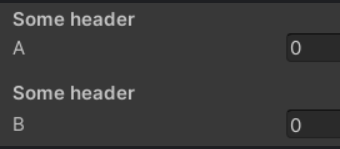
Display a header before attributes to visually group them.
[Header("Some header")]
// some attributes
Add Spacing
You can add some vertical spacing to increase readability.
[Header("Some header")]
[SerializeField] private int a;
[Space(2)]
[Header("Some header")]
[SerializeField] private int b;

Backward compatibility
Backward compatibility when renaming an attribute:
[SerializeField]
[FormerlySerializedAs("oldName")] private int number = 0;
Add Entry To Create Menu
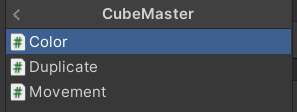
You can sort your new components in the "create" menu, similarly to how the existing components are sorted (Audio, UI, etc.).
[AddComponentMenu("CubeMaster/Movement")] // [Path/]Name
public class MovementManager : MonoBehaviour {}


Help URL
You can define the link opened when clicking on the "?".
[HelpURL("https://example.com/documentation/SomeClass.html")]
public class SomeClass : MonoBehaviour {}
Hide Public Attributes
To hide a public attributes from the inspector, use:
[HideInInspector] public float hide;
Component Usage Restrictions
When adding this component, required components are automatically added. If it's not possible, we can't use this component.
[RequireComponent(typeof(Collider))]
public class SomeClass : MonoBehaviour {} // One
[RequireComponent(typeof(Collider), typeof(Rigidbody))]
public class SomeClass : MonoBehaviour {} // Multiple
We can prevent users from using this component more than once on the same game object using:
[DisallowMultipleComponent]
public class SomeClass : MonoBehaviour {}
Input Numbers
We can customize the input field for numbers:
[Min(10)] public int speed = 15;   // max value
[Range(0, 1)] public float volume; // show a slider
Input Strings
We can customize the input field for strings:
[Multiline(2)] public string text = "";
// or [TextArea( minLines, maxLines )]
[TextArea] public string textarea = "";
Add Menus to ContentMenu
You can add menus shown when using right-clicking on your component. Each menu is associated with a function.
[ContextMenuItem("reset", "ResetIntWithMenuItem")]
public int intWithMenuItem;
private void ResetIntWithMenuItem()
{
	intWithMenuItem = 12;
}
Advanced Types
[Serializable] // using System
public class NestedClass // <=> struct
{
	public int nestedAttribute;
}
[SerializeField] private NestedClass nestedClass;
Custom Inspector Names For Enum Values
private enum Axis
{
	[InspectorName("X-axis")] X,
	[InspectorName("Y-axis")] Y
}
[SerializeField] private Axis axis = Axis.X;
Console Logs 📺
The console is a tab of the Project window. You can clear the console with clear. From the code, we can print logs in the console using:
- Normal Logs (Debug)
Debug.Log("message");
Debug.Log("<color=red>Warning!</color>");
Debug.Log($"$(variable)");
Debug.LogFormat("{0}", variable);
// <color=#cd542a>, <b></b>, <i></i>, <size=25></size>
- Warnings
Debug.LogWarning("warning");
- Errors
Debug.LogError("error");
- Pause The Game
Debug.Break();
- Assert Condition Is True
Debug.Assert(condition, "message");
Debug slows the game as it saves logs to a file too ⚠️. A common practice is to wrap them in a conditional compilation clock:
#if UNITY_EDITOR
Debug.Log("message");
#endif
We usually create a Logging class to handle that logic. We can disable logging from the code:
Debug.unityLogger.logEnabled = false;
Debug.unityLogger.logEnabled = Debug.isDebugBuild;
Scriptable Objects
Scriptable objects are data containers to store and manipulate data in a way that is easy to use, share, and extend. They are often used to define game item data, character data, settings, etc.
using UnityEngine;

[CreateAssetMenu(fileName = "XXX", menuName = "YYY/XXX", order = 1)]
public class XXX : ScriptableObject
{
    // define attributes, methods, etc.
}
Coding Conventions
The name of a method should start with an uppercase.
- private void myMethod() {}
+ private void MyMethod() {}
You should explicitly add the qualifier.
- void MyMethod() {}
+ private void MyMethod() {}
Private attributes should start/end with an underscore (_).
- private int myAttribute;
+ private int _myAttribute;
Attributes should be private or protected
- int myAttribute;            // not private (implicit)
- public int myAttribute;     // not public
+ protected int _myAttribute; // either explicit protected
+ private int _myAttribute;   // or explicit private
Public attributes should NOT start/end with an underscore (_).
- public int _myAttribute;
- [SerializeField] private int _myAttribute;
+ public int myAttribute;
+ [SerializeField] private int myAttribute;
The last instruction must not be an "if" statement.
- private void MyMethod()
- {
- 	// some code here (optional)
- 	if (something) {
- 	    // some code here
- 	}
- }
+ private void MyMethod()
+ {
+ 	// some code here (optional)
+ 	if (!something) return; // faster return
+ 	// some code here
+ }
Don't call GetComponent<T>() often. Do it once.
-GetComponent<T>().smth()
-GetComponent<T>().smth()
+var component = GetComponent<T>(); // or an attribute
+component.smth()
+component.smth()
👻 To-do 👻
Stuff that I found, but never read/used yet.
- SelectionBase
- SettingsProvider (new version of PreferenceItem): Preferences
- MenuItem: toolbar
- CreateAssetMenu (ScriptableObject): asset list
- CanEditMultipleObjects: can be set when selecting multiple game objects
- Icons for scripts
- Unity Script Collection
MonoBehavior#OnEnable
var editingScope = new PrefabUtility.EditPrefabContentsScope(assetPath)
IReadOnlyList
AssetDatabase
LoadAssetAtPath<T>
Concepts
- StateMachine => OnStateEnter / OnStateUpdate / OnStateExit
- Object pooling
- Avoid using DontDestroyOnLoad for passing data. use
SceneManager.LoadScene(<path>, LoadSceneMode.Additive)andSceneManager.UnloadScene. - Conditional Compilation. Assembly Definition Files (ADF) (one DDL per ???, default without ADF): everything is recompiled on every change. Assembly def + ref.

